
Cell Thawing & Media Preparation
Biosafety Cabinet Preparation
- Turn on the biosafety cabinet.
- Allow it to run for at least 15 minutes before beginning work to purge the air and ensure sterile airflow.
- Disinfect the surface. Wipe down all internal surfaces (sash, sidewalls, and work area) with 70% ethanol, using sterile wipes.
- Take and spray all items with 70% ethanol before placing them in the hood:
- 15 mL, 50 mL Falcon tubes
- Sterile pipettes (1 mL, 5 mL, 10 mL) and pipette controller
- Petri dishes (6 cm/10 cm)
- Sterile waste container (for pipettes and tips)
- 70% ethanol spray bottle
Media Preparation
- Turn on the water bath and set the temperature to 37 °C.
- While the water bath equilibrates, get your bottle of complete DMEM from the refrigerator.
- Prepare the fresh DMEM medium in 50 mL Falcon tube according to this composition:
- DMEM - 45 mL
- FBS 10% - 5 mL
- Penicillin-Streptomycin (100×) 1% - 500 μL
- Place the bottle in the 37 °C water bath until warm (~10 min).
Thawing Cells
- Wear gloves and loosen the vial cap slightly to avoid pressure buildup.
- Re-tighten the cap and immerse the vial in the 37 °C water bath, swirling gently.
- Thaw rapidly, until only a tiny ice crystal remains (~1 minute).
- Immediately remove the vial, dry it with tissue, and spray with 70% ethanol.
- Transfer the vial into the biosafety cabinet.
- Inside the hood, open the vial carefully.
- Transfer its contents (~1 mL) into a 15 mL conical tube.
- Slowly add 9 mL of warm complete DMEM dropwise while gently swirling to avoid osmotic shock.
- Mix gently by flicking the tube or pipetting slowly.
- Centrifuge at 200 × g for 5 minutes at room temperature.
- Carefully aspirate the supernatant.
- Resuspend the cell pellet in:
- 10 mL complete DMEM for one 10 cm dish, or
- 4-5 mL if using two 6 cm dishes.
Plating
- Add the resuspended cells to the Petri dishes.
- Gently swirl the dish front-to-back and side-to-side to distribute cells evenly.
- Label each dish with:
- Cell line name "HEK293T"
- Date
- Passage number
- Your initials
- Place the dishes in a 37 °C, 5% CO₂ incubator.
- Allow cells to attach overnight.
Post-Thaw Care
- After attachment, replace the medium with fresh, warm complete DMEM to remove residual DMSO and dead cells.
- Feed cells every 2-3 days or when the medium starts to turn yellow.
- Passage when 70-90% confluent using TrypLE.
- Always record passage number and date.
Cell Culturing
Prepare the Biosafety Cabinet
- Turn on the hood 15 minutes before starting.
- Wipe all inner surfaces with 70% ethanol.
- Spray and place all sterile materials inside:
- Warmed DMEM complete medium (RT)
- TrypLE Express (RT)
- PBS (Ca²⁺/Mg²⁺-free) for washing (RT)
- New tissue-culture dishes or flasks
- Sterile pipettes (5 mL, 10 mL, 25 mL)
- Waste container and ethanol spray bottle
Cell Assessment
- Take out the cells from the incubator and observe your cells under the microscope.
- Cells should cover ~80–90% of the dish and look healthy.
- Place the dish in the hood.
Washing
- Aspirate the spent medium using a sterile aspirator or vacuum pipette.
- Add enough PBS to cover the cell layer (2-3 mL for a 6 cm dish, 5-10 mL for a 10 cm dish).
- Aspirate the PBS completely.
Trypsinization
- Add just enough TrypLE to cover the cell layer:
- 6 cm dish: 1 mL
- 10 cm dish: 2-3 mL
- Tilt the plate to ensure the entire surface is coated.
- Incubate at 37 °C for 1-3 minutes. Do not over-trypsinize - HEK293 detaches quickly.
- When cells start rounding up and detaching, tap the side of the dish gently to release them.
Neutralization and Collection
- Once cells are detached, add warm complete DMEM to stop trypsin:
- Add 4-5 mL for a 6 cm dish, or 8-10 mL for a 10 cm dish.
- Pipette up and down gently to break up clumps and make a single-cell suspension.
- Transfer the suspension into a 15 mL conical tube.
- (Optional) Take 10 µL to check viability or cell count with trypan blue.
Preparation for Reseeding
- Prepare new labeled dishes with pre-warmed medium:
- 6 cm dish: 2-3 mL
- 10 cm dish: 8-10 mL
- Centrifuge at 300 × g for 5 minutes at RT. Do not forget to balance!
- Remove the supernatant and add fresh pre-warmed medium (1 mL) to the cell pellet.
- Resuspend the pellet carefully and transfer to the new dishes.
Seeding
- Depending on growth rate, split at ratios of:
- 1:3 (if very confluent)
- 1:5 (for routine maintenance)
- 1:10 (if you want slower growth or preparing frozen stocks soon)
- Gently rock the dish to distribute cells evenly.
- Place the new dishes in the 37 °C, 5% CO₂ incubator.
- Move gently front-to-back and side-to-side to ensure even seeding.
- Check after 24 h for attachment and healthy morphology.
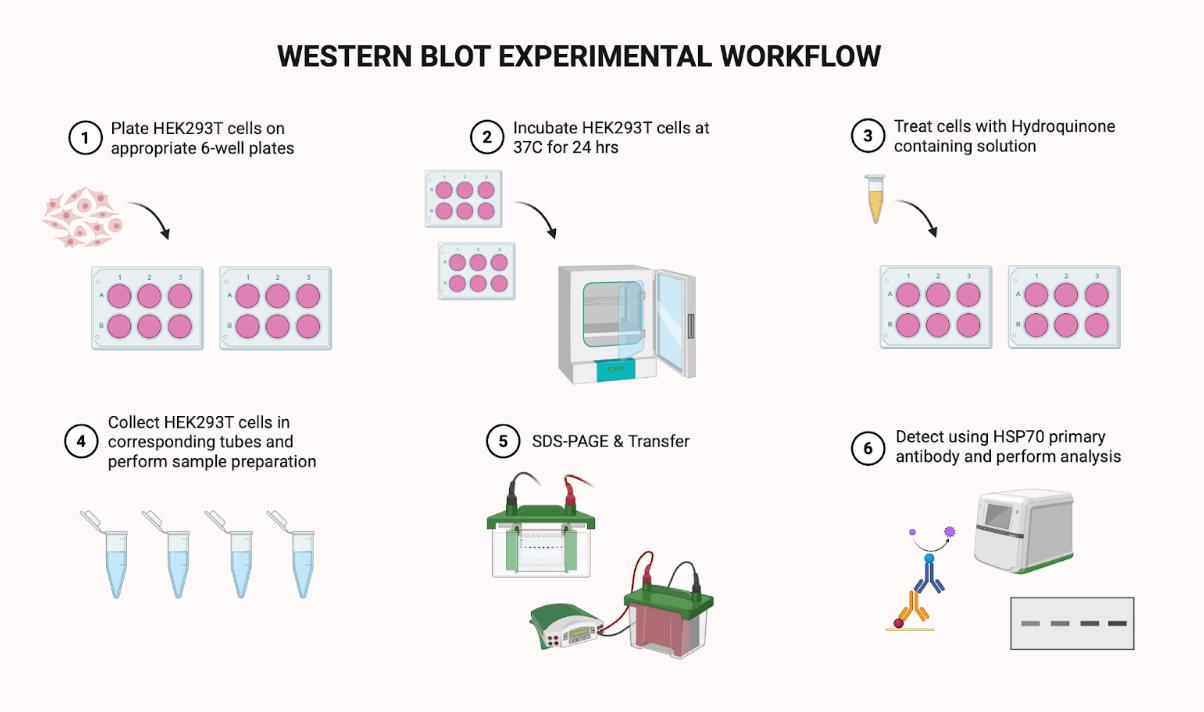
Western Blot
Harvesting HEK293T Cells
- Prepare the required materials:
- Labeled micro-centrifuge tubes, rack, ice bucket filled with ice, pipettes, PBS, Trypsin-EDTA, 4× Laemmli Sample Buffer, DMEM complete growth media.
- Remove the conditioned growth media (DMEM+/+) by aspirating.
- Gently wash the cell monolayer with 1 mL of cold PBS. Carefully add PBS to the side of the flask/dish so as not to forcefully dislodge adherent cells. Keep PBS in the ice!
- Remove the PBS by suction.
- Add 200 μL of pre-warmed Trypsin-EDTA to the flask and place in an incubator for 1-2 minutes. Check flask frequently to ensure all cells have dissociated from the flask surface.
- When all cells are detached, neutralize/deactivate the dissociation reagent with 1 mL DMEM+/+.
- Transfer cell suspension to the corresponding cold microcentrifuge tube on ice. Ensure that all cells have been harvested from the flask.
- Centrifuge the cell suspension for 1 min at 12,000 RPM at 4°C. Remove the supernatant.
- Add 1 mL of PBS to the pellet.
- Centrifuge the cell suspension for 1 min at 12,000 RPM at 4°C. Remove the supernatant.
- Centrifuge the cell suspension for 1 min at 12,000 RPM at 4°C. Remove the residual PBS***.
- Add 40 μL of PBS and suspend the cells in the ice.
- Add 40 μL of 4× Laemmli Sample Buffer. Mix the suspension by vortexing.
- Insert the protective cap into microcentrifuge tubes, then boil for 13 minutes.
- Cool down the suspension.
- Centrifuge the cell suspension for 1 min at 7,000 RPM at room temperature.
- Mix the suspension.
- Centrifuge the cell suspension for 1 min at 7,000 RPM at room temperature.
- Proceed with the SDS-PAGE.
***Note: It is possible to freeze the cells at this stage. You have to melt the cells in the ice for 10 minutes prior to preparing the sample.
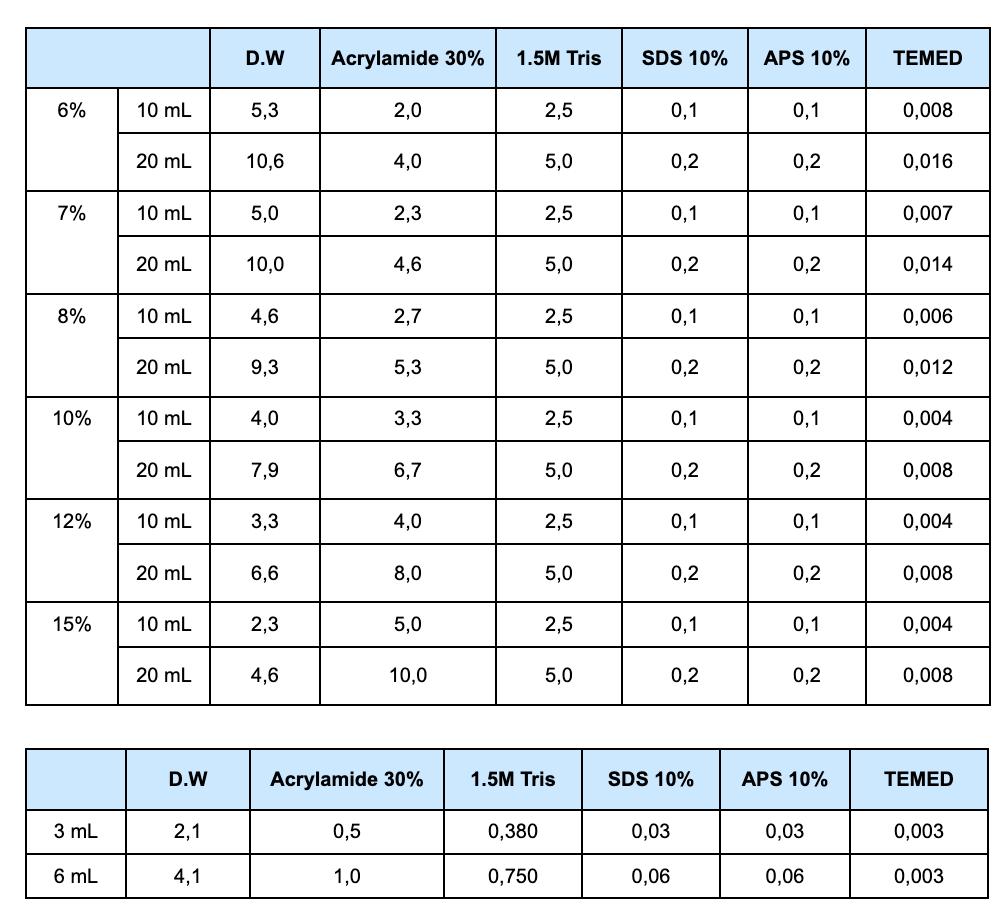
SDS-PAGE
- Take the gel cassette, supporting rubber and holder.
- Prepare the 12% resolving gel:
- Add distilled water.
- Add 30% acrylamide.
- Add 1.5M Tris (pH 8.8).
- Add 10% SDS.
- Add 10% APS.
- Add TEMED.
- For preparing 5% stacking gel:
- Add distilled water.
- Add 30% acrylamide.
- Add 1.0M Tris (pH 6.8).
- Add 10% SDS.
- Add 10% APS.
- Add TEMED.
- Wait for 15 minutes to allow the resolving gel to harden.
- Pour 1 mL isopropanol to even out the resolving gel surface.
- Remove isopropanol, then wash with distilled water.
- Pour the 5% stacking gel on top of the resolving gel.
- Introduce clean combs.
- Wait for the stacking gel to harden, then remove the combs.
- Wash the gel cassette carefully, again place them inside the gel box.
- Add a new running buffer inside and a used running buffer outside of the cassette.
- Prepare 8 μL protein marker:
- 1.5 μL protein marker + 6.5 μL 2× sample buffer.
- Carefully load the samples (buffer, S1, S2, …, 8 μL protein marker, buffer).
- Close the lid.
- Connect the cables to the power supply. Make sure to match the colors on the cables to those on the power supply inputs.
- Program the power supply and start the run:
- 200 Volt - 40 minutes, or
- 120 Volt - 60+ minutes, or
- 50 Volt - 180 minutes
- Check whether the bubbles are appearing or not.
Resolving Gel Recipes (1.5M Tris, pH 8.8)
| Concentration | Volume | D.W (mL) | Acrylamide 30% (mL) | 1.5M Tris (mL) | SDS 10% (mL) | APS 10% (mL) | TEMED (mL) |
|---|---|---|---|---|---|---|---|
| 6% | 10 mL | 5.3 | 2.0 | 2.5 | 0.1 | 0.1 | 0.008 |
| 6% | 20 mL | 10.6 | 4.0 | 5.0 | 0.2 | 0.2 | 0.016 |
| 7% | 10 mL | 5.0 | 2.3 | 2.5 | 0.1 | 0.1 | 0.007 |
| 7% | 20 mL | 10.0 | 4.6 | 5.0 | 0.2 | 0.2 | 0.014 |
| 8% | 10 mL | 4.6 | 2.7 | 2.5 | 0.1 | 0.1 | 0.006 |
| 8% | 20 mL | 9.3 | 5.3 | 5.0 | 0.2 | 0.2 | 0.012 |
| 10% | 10 mL | 4.0 | 3.3 | 2.5 | 0.1 | 0.1 | 0.004 |
| 10% | 20 mL | 7.9 | 6.7 | 5.0 | 0.2 | 0.2 | 0.008 |
| 12% | 10 mL | 3.3 | 4.0 | 2.5 | 0.1 | 0.1 | 0.004 |
| 12% | 20 mL | 6.6 | 8.0 | 5.0 | 0.2 | 0.2 | 0.008 |
| 15% | 10 mL | 2.3 | 5.0 | 2.5 | 0.1 | 0.1 | 0.004 |
| 15% | 20 mL | 4.6 | 10.0 | 5.0 | 0.2 | 0.2 | 0.008 |
Stacking Gel Recipe (1.0M Tris, pH 6.8)
| Volume | D.W (mL) | Acrylamide 30% (mL) | 1.0M Tris (mL) | SDS 10% (mL) | APS 10% (mL) | TEMED (mL) |
|---|---|---|---|---|---|---|
| 3 mL | 2.1 | 0.5 | 0.380 | 0.03 | 0.03 | 0.003 |
| 6 mL | 4.1 | 1.0 | 0.750 | 0.06 | 0.06 | 0.003 |
Transfer
- Prepare all the necessary instruments: sponges, knife, nitrocellulose membrane, 3M paper, ice box, ice bucket, transfer buffer, power supply, transfer tank.
- Gently remove the gel from the cassette.
- Label the nitrocellulose membranes according to the given samples.
- Place the transfer tank inside the ice bucket.
- Put ice inside the transfer tank and around it.
- Pour the transfer buffer into the washing box.
- Soak the 3M papers, sponge & nitrocellulose membrane before the assembly of the sandwich.
- Prepare the sandwich:
- Sponge
- 3M paper
- Membrane (anode (+)) (RED)
- Gel (cathode (-)) (BLACK)
- 3M paper
- Sponge
- Gently remove the bubbles between the gel and the membrane by using your hand. Otherwise, they will inhibit the transfer process.
- Place the sandwich into the transfer cassette. Remember that the gel side of the cassette faces the cathode (-) while the membrane side faces the anode (+).
- Close the square lid.
- Connect the cables to the power supply. Transfer time is fixed to 90 minutes.
- Start with 180 mA (-90 Volts).
- Place the brick on the lid to press it.
Immunodetection
- Block the membrane with skim milk in TBST for 30 minutes at room temperature on a shaker.
- Add primary antibody and incubate overnight on a shaker.
- Wash the membrane with TBST for 10 minutes. Do this 3 times! (All washing and antibody incubation steps should be done on a shaker at room temperature to ensure even agitation)
- Dilute the secondary antibody:
- Add 6 mL of skim milk per blot.
- Add secondary antibody 1/2000 (1/5000 for housekeeping genes).
- Add a secondary antibody and incubate for 1 hour on a shaker.
- Discard the secondary antibody.
- Wash the membrane with TBST for 10 minutes. Do this 3 times! (All washing and antibody incubation steps should be done on a shaker at room temperature to ensure even agitation)
- Add 1 mL of ECL and 3 μL of H₂O₂.
- Mix well and spread over the membrane surface.
- Visualize the result using the Fusion Solo software.
MTT Assay
Perform the experiment according to the manufacturer's protocol (CyQUANT™ MTT Cell Proliferation Assay Kit). On the day of the experiment, prepare the following reagents.
Reagent Preparation
- Prepare a 12-mM MTT stock solution by adding 1 mL of sterile PBS to one 5-mg vial of MTT (Component A). Vortex to mix or sonicate the solution until it is dissolved. If some particulate material does not dissolve, remove by filtration or centrifugation.
Note: MTT stock solution can be stored at 4°C for up to 4 weeks protected from light. - Prepare the SDS-HCl solution by adding 10 mL of 0.01 M HCl to one tube containing 1 g of SDS (Component B). Mix the solution gently by inversion or sonication until the SDS dissolves. Once prepared, use the SDS-HCl solution promptly.
Assay Procedure
- Replace the culture medium according to your cell type. For adherent cells, remove the medium, then add 100 μL of fresh culture medium.
- Add 10 μL of the 12-mM MTT stock solution to each well. Include a negative control by adding 10 μL of the MTT stock solution to 100 μL of medium alone.
- Incubate at 37°C for 4 hours or overnight. For cell densities >100,000 cells per well, the incubation time can be shortened to 2 hours.
- Add 100 μL of the SDS-HCl solution to each well, then pipet up and down thoroughly to mix.
- Incubate the microplate at 37°C for 4-18 hours in a humidified chamber. Longer incubations will decrease the sensitivity of the assay (Niks, 1990).
- Pipet up and down to mix each sample again, then read the absorbance at 570 nm.